之前说的是本地代理设置,现在记录一下远程代理服务器squid的使用方法。
# squid简介
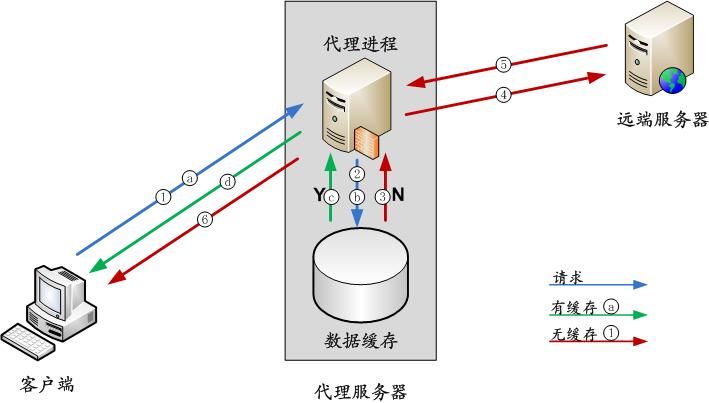
据官网介绍,Squid是Web的缓存代理,支持HTTP,HTTPS,FTP等。通过缓存和重用经常请求的网页,它减少了带宽并缩短了响应时间。Squid具有广泛的访问控制,是一个出色的服务器加速器。它可以在大多数可用的操作系统(包括Windows)上运行,并已获得GNU GPL的许可。
资源网址:
# squid作用
- 缓存经常请求使用的网页
- 减少带宽缩小响应时间
- 加速网页访问
- 对访问内容进行过滤控制
- 共享网络连接,节省ip开销
# 安装配置
安装前准备工作:
- 一台远程Linux服务器
- 一台具有上网功能的本地计算机
# 安装squid
yum install squid httpd-tools -y
1
# 配置squid
打开/etc/squid/squid.conf
配置文件全部内容:
#
# Recommended minimum configuration:
#

# Example rule allowing access from your local networks.
# Adapt to list your (internal) IP networks from where browsing
# should be allowed
acl localnet src 10.0.0.0/8     # RFC1918 possible internal network
acl localnet src 172.16.0.0/12  # RFC1918 possible internal network
acl localnet src 192.168.0.0/16 # RFC1918 possible internal network
acl localnet src fc00::/7       # RFC 4193 local private network range
acl localnet src fe80::/10      # RFC 4291 link-local (directly plugged) machines

acl SSL_ports port 443
acl Safe_ports port 80          # http
acl Safe_ports port 21          # ftp
acl Safe_ports port 443         # https
acl Safe_ports port 70          # gopher
acl Safe_ports port 210         # wais
acl Safe_ports port 1025-65535  # unregistered ports
acl Safe_ports port 280         # http-mgmt
acl Safe_ports port 488         # gss-http
acl Safe_ports port 591         # filemaker
acl Safe_ports port 777         # multiling http
acl CONNECT method CONNECT

#
# Recommended minimum Access Permission configuration:
#
# Deny requests to certain unsafe ports
http_access deny !Safe_ports

# Deny CONNECT to other than secure SSL ports
http_access deny CONNECT !SSL_ports

# Only allow cachemgr access from localhost
http_access allow localhost manager
http_access deny manager

# We strongly recommend the following be uncommented to protect innocent
# web applications running on the proxy server who think the only
# one who can access services on "localhost" is a local user
#http_access deny to_localhost

#
# INSERT YOUR OWN RULE(S) HERE TO ALLOW ACCESS FROM YOUR CLIENTS
#

# Example rule allowing access from your local networks.
# Adapt localnet in the ACL section to list your (internal) IP networks
# from where browsing should be allowed
http_access allow localnet
http_access allow localhost

# And finally deny all other access to this proxy
http_access deny all

# Squid normally listens to port 3128
http_port 3128

# Uncomment and adjust the following to add a disk cache directory.
#cache_dir ufs /var/spool/squid 100 16 256

# Leave coredumps in the first cache dir
coredump_dir /var/spool/squid

#
# Add any of your own refresh_pattern entries above these.
#
refresh_pattern ^ftp:           1440    20%     10080
refresh_pattern ^gopher:        1440    0%      1440
refresh_pattern -i (/cgi-bin/|\?) 0     0%      0
refresh_pattern .               0       20%     4320
1
2
3
4
5
6
7
8
9
10
11
12
13
14
15
16
17
18
19
20
21
22
23
24
25
26
27
28
29
30
31
32
33
34
35
36
37
38
39
40
41
42
43
44
45
46
47
48
49
50
51
52
53
54
55
56
57
58
59
60
61
62
63
64
65
66
67
68
69
70
71
72
73
2
3
4
5
6
7
8
9
10
11
12
13
14
15
16
17
18
19
20
21
22
23
24
25
26
27
28
29
30
31
32
33
34
35
36
37
38
39
40
41
42
43
44
45
46
47
48
49
50
51
52
53
54
55
56
57
58
59
60
61
62
63
64
65
66
67
68
69
70
71
72
73
修改以下信息
# 监听端口号
http_port 3128

# 这样写会同时监听ipv6和ipv4的端口
#  http_port 0.0.0.0:3128

# 添加到末尾
# 内存中的缓存大小
cache_mem 128 MB

# 最大缓存文件大小
maximum_object_size 16 MB

# 限定下载文件大小
reply_body_max_size  1024000 allow all

# 缓存文件夹,默认在内存中,指定缓存大小为100M,第一层子目录为16个,第二层为256
cache_dir ufs /var/spool/squid 100 16 256

# 定义访问日志路径
access_log /var/log/squid/access.log

# 定义管理员邮箱
cache_mgr jcguanqi@126.com
1
2
3
4
5
6
7
8
9
10
11
12
13
14
15
16
17
18
19
20
21
22
23
24
2
3
4
5
6
7
8
9
10
11
12
13
14
15
16
17
18
19
20
21
22
23
24
**是否认证访问:**如果使用访问认证,会更安全。
# 访问认证配置方法
- 生成密码文件
htpasswd -c /etc/squid/passwd test
# 回车后输入密码,不要超过8位
1
2
2
- 测试是否生效
/usr/lib64/squid/basic_ncsa_auth /etc/squid/passwd
# 输入用户名和密码
test 123456
# 如果ok说明成功
OK
1
2
3
4
5
2
3
4
5
- 加入配置文件
# 注释以下内容:
# http_access deny !Safe_ports
# http_access deny CONNECT !SSL_ports
# http_access deny to_localhost
# http_access allow localnet
# http_access deny all

# 定义每个IP最大允许16个连接,防止攻击
acl OverConnLimit maxconn 16

auth_param basic program /usr/lib64/squid/basic_ncsa_auth /etc/squid/passwd

# 认证程序的进程数
auth_param basic children 6

# 客户端提示
auth_param basic realm test Squid Server

# 有效时间
auth_param basic credentialsttl 1 hours

# 认证用户
acl auth_user proxy_auth REQUIRED

# 超出之前设定的连接数则拒绝
http_access deny OverConnLimit

# 允许的访问
http_access allow auth_user

# 拒绝其它所有访问
http_access deny all
1
2
3
4
5
6
7
8
9
10
11
12
13
14
15
16
17
18
19
20
21
22
23
24
25
26
27
28
29
30
31
32
2
3
4
5
6
7
8
9
10
11
12
13
14
15
16
17
18
19
20
21
22
23
24
25
26
27
28
29
30
31
32
如果不使用访问认证,就在配置文件末尾加入http_access allow all
# 常用命令
# 初始化
squid -z
chown -R squid:squid/cache
1
2
2
# 验证语法配置
squid -k parse
1
# 启动并输出
/usr/local/squid/sbin/squid -N -d1
1
# 查看进程
ps -ax | grep squid
1
# 停止服务
squid -k shutdown
1
# 启动服务
# 初始化服务
./squid -z
1
# 开启防火墙
firewall-cmd --add-port=3128/tcp --permanent
firewall-cmd --reload
1
2
2
# 开启服务
systemctl enable squid
systemctl start squid
systemctl status squid
1
2
3
2
3
# 查看端口状态
netstat -tnl
1

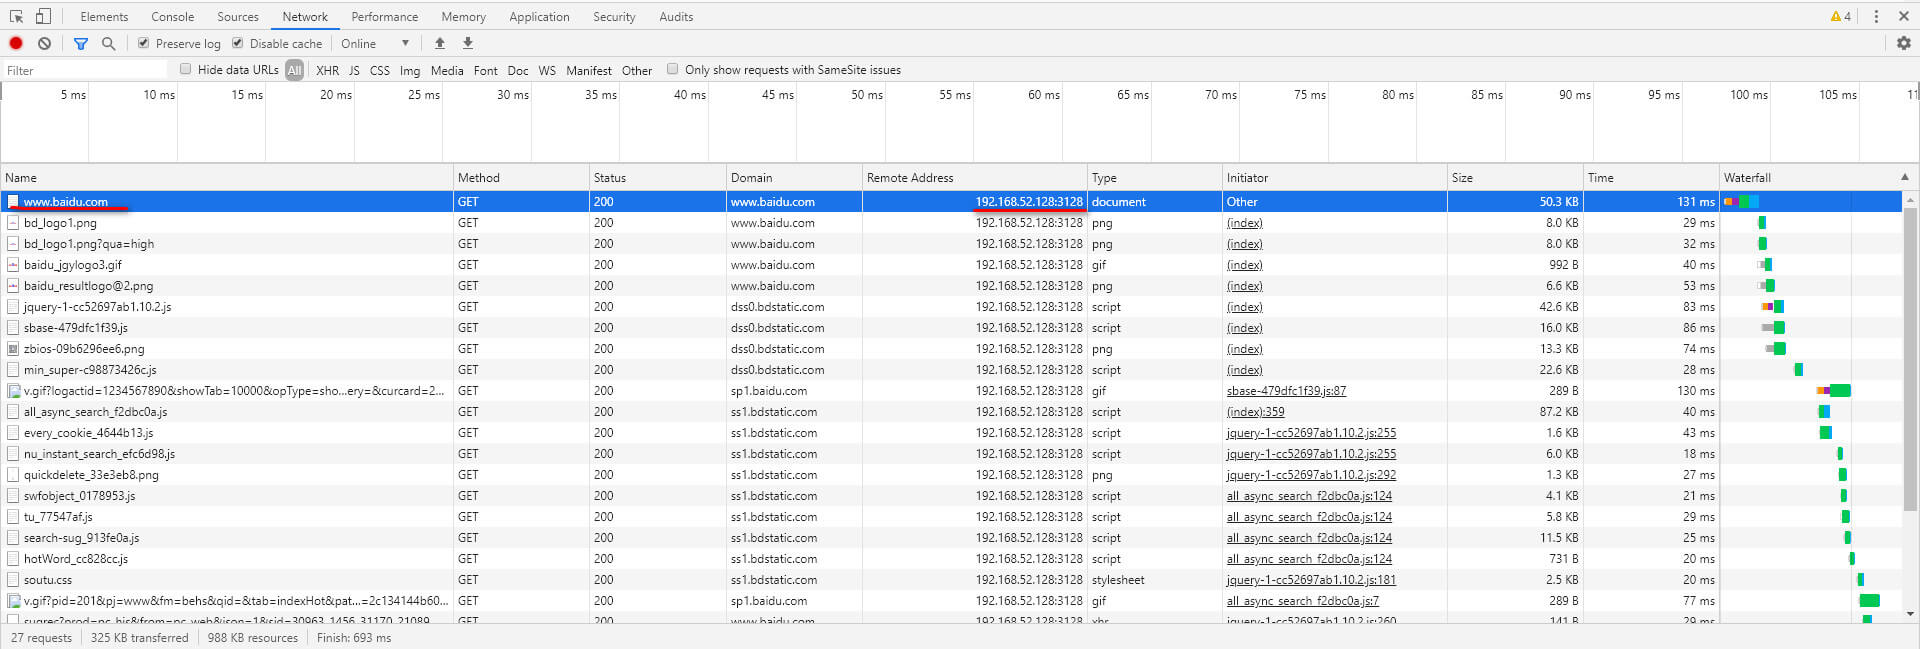
# 本地设置
打开本地游览器,进入代理设置,然后保存。
随便打开一个网站,F12检查查看网络请求情况。
# 写在最后
squid功能还有很大,这里只是介绍一种功能。


